Luckily, it turned out pretty well.
I bet you'll never guess where I got the idea from to do a pouf! Well, I guess I've seen the idea lots of places, but I got the courage to do one from, yep, Young House Love. Specifically here. If you click over there, you'll see she used this Living With Punks tutorial, so that's where I went for instructions, too. The instructions were pretty good. Not every minute detail, like I always think I need, but enough that even an ametuer like me was able to fill in the blanks.
I wanted my pouf to be bigger than the ones in the tutorial, so I changed the measurements and made a 22" diameter top/bottom and a 14" high band, with an 3x7" handle.
My drafting compass (you know, one of those things with a pencil in one end and a point in the other to stick into the paper) wasn't nearly big enough to do a 2-foot circle. Attaching a string to it (similar in concept to making a ring for an outdoor fire pit) wasn't working either. What to do, what to do. Normal people would probably first turn to the internet for a solution. But me? Nohohoho. I "think outside the box". So I tried to find stuff around the house that round and huge. The only thing I had close in size was Jason's IKEA tunnel. Here's how that turned out.
Not perfectly round. I tried to make it work anyway, but it just didn't.
Thankfully, this genius of a woman (The Scientific Seamstress) came up with a circle template for large circles that you could download and print, found here! Yay! Worked much better. Cut out my template...
Placed it on my fabric to make sure it fit...
Realized I'd have to settle for a 22" diameter circle instead of a full 24".
Began tracing...
And then cut out my first circle. Exciting!
I had to use a different fabric for the bottom piece because I only had a yard of the other fabric and it wasn't enough for 2 big circles and everything else. This fabric was from a Moby-type wrap (for carrying babies) that my cousin gave me. She never used it. I never used it. Thus, it got cut up and used for this. But it was the cause of my size restrictions. Also, the fabric is a loose weave (which you can kinda see three shots up), so I don't know how it'll hold up over time, and it made it a little tricky to work with - almost like working with stretchy fabric. Oh well. It's on the bottom and I didn't want to waste good home decor fabric where no one would see it and it'd get beaten up more.
On to the other measuring.
On Living with Punks, I figured out that her band was 3x (+ 1/2") the diameter of her circles. That meant that my band would have to be at least 66.5" long. I think I cut a total of 67" just to be safe. Had to cut it out in two sections to create that length. (This picture is just to kind of show how I did my markings.)
My sewing ruler thing is only 12", and I wanted my pouf to be taller than that. I marked where the 12" lines were, but with the fabric that was left after cutting out the circle and doing two strips instead of just one long one, I only had room for another 2" of height. See the line below?
I didn't take any pictures of the fabric all cut out or any of the pieces coming together as I sewed. Sorry. I was on too much of a get-it-done kick and it was always late in the evening which means bad pictures anyway. But if you go to Living With Punks, she has all that for you.
That just means I can skip to the chase! Here's the final product!
Oh wait. That's not the 100% final product. This is at about 95%.
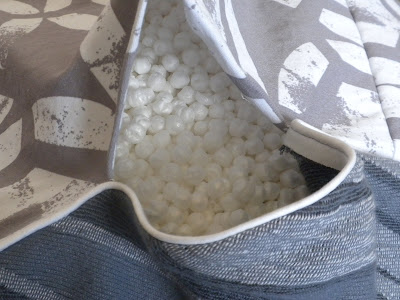
I had filled it with an entire 2 cu. ft. bag of small styrofoam balls through about a 6" opening.
 |
| via KMart.com |
Seemed like it would be pretty quick. Nope. Took about an hour and a half. Even with it all in there, it wasn't as full as I wanted it to be. Fortunately, I had an old sleeping pillow that had been through Jason/the wash so many times that it lost all natural pillow shape, renduring it useless as a pillow to sleep on but ideal for pouf filling. *cha-ching*
Sliced that baby open, cut some chunks of batting off, and shoved them into the center of my pouf, amidst the styrofoam. Then I hand sewed the opening shut, which, although imperfect, I'm pretty proud of.
Now on to the less than pretty-proud-of spots.
And there's one more that I didn't take a picture of. Clearly, I had a little trouble with having too much fabric in some spots. Eh *shrug* oh well. (That last one looks like a little tail. Haha) But there are other things I'm proud of too.
The cording is supposed to overlap and look just like that. Yay! And the handle is probably my favorite because I got it to blend so well with the pattern.
And now for the final finals.


